SQL Database Querying
Overview #
The following will lay out how to:
- Connect to a Database
- Query Data
- Export Data
Connecting to the database #
Each time you open SQL Server Management Studio (SSMS), you will be prompted to connect to a Database Server. The first time you connect, you'll need to fill in the Server name: field. After your first connection, the last Server name: you connected to will be there by default. If you have connected to other servers in the past, they should appear in the Sever name: drop down.
The Authentication field will always be Windows Authentication. You should never need to type in a password in order to connect, this is handled by Active Directory permissions.
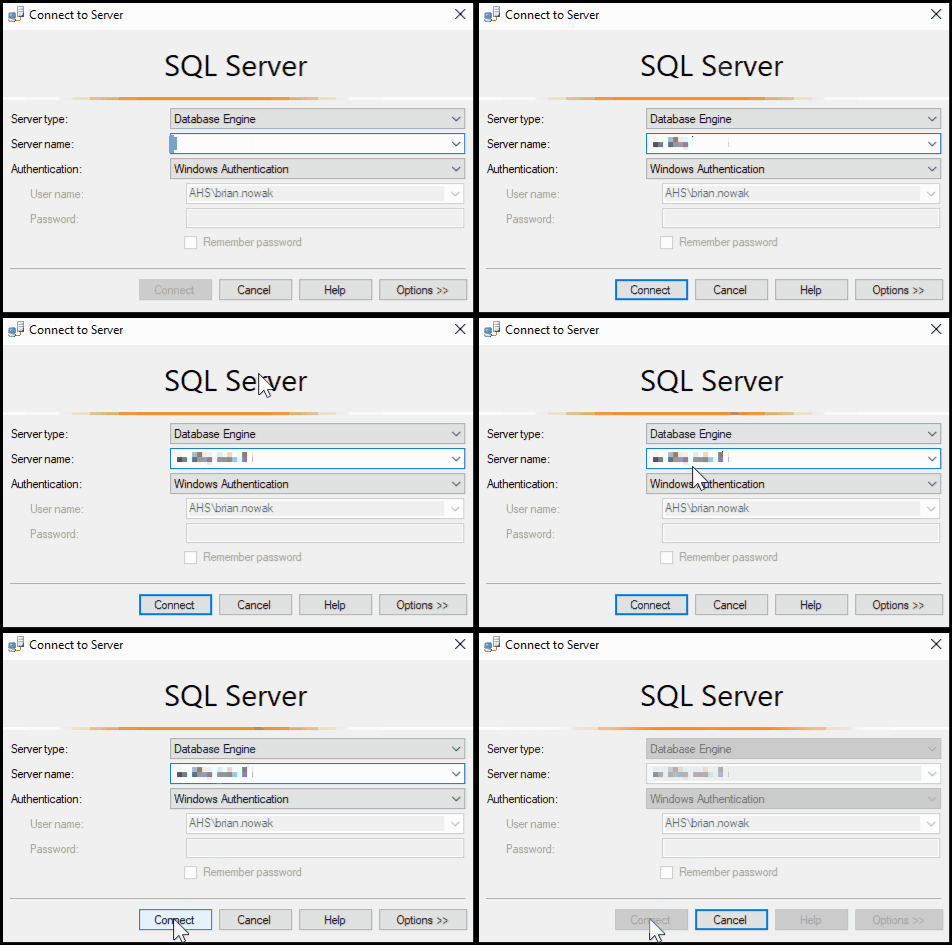
If you cannot connect, contact AHS.VDHITDatabaseTeam@vermont.gov. They can help with getting you assigned to the appropriate Active Directory Group(s) needed for accessing a database. If you do not see the Object Explorer Window, press the F8 key, or go to View-->Object Explorer
Querying Data #
First Time Connecting #
After you connect to your database, the Object Explorer window will appear on the left side with the server(s) you are connected to. Expand the node to browse the databases and objects they house.
Example : Browse to your database's Views
- Expand the Server Node (Often expanded by default)
- Expand the Databases Node
- Expand the Node of the database you are working with - In this example it's our
AdventureWorks2017database. - Expand the Views Node
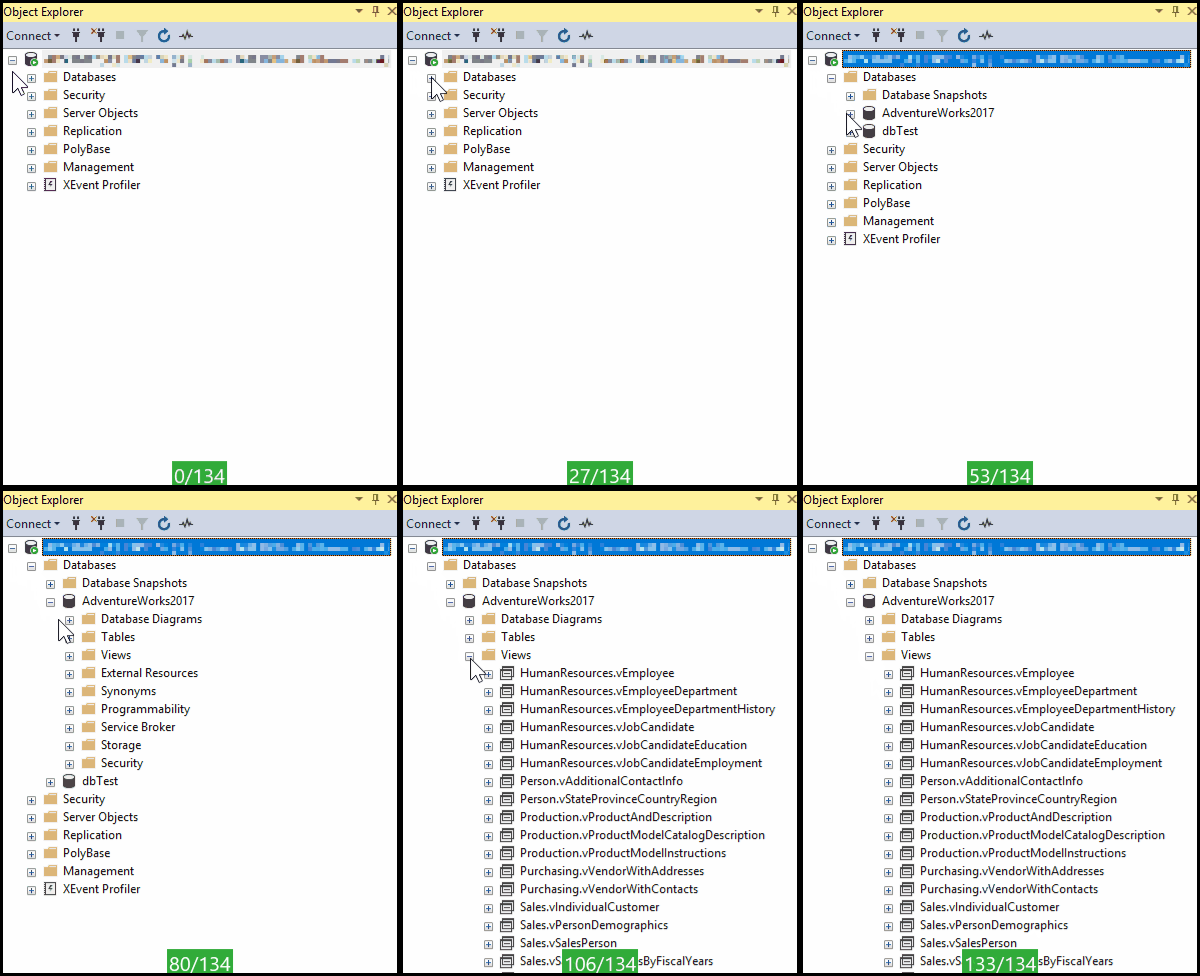
You can follow this same process to expand the Tables folder if you wish to look at the raw data that seeds the Views.
Basic Queries #
There are a number of ways data can be queried, a few of these are explained below.
Option 1 - From Object Explorer
If you Right-Click on a view, you can then use the SELECT Top 1000 Rows option.

This will generate a select statement against the system for the TOP 1000 rows in the view.
Advantages: This is a very quick way to get a select statement that can then be modified with a Where Clause for quickly retrieving data. It also includes the names of all the columns, so you can remove those that you do not need in your results.
Disadvantages: If there are more than 1000 records, they will not be displayed unless you remove the TOP 1000 portion of the query.
Option 2 - From New Query Window
Create a New Query and write the sql yourself.
You can either Right Click on the name of the database, in this case AdventureWorks2017, or click the New Query button on the top. When doing either of these, double check the Database Dropdown in the upper left menu ribbon. It should be populated with the name of your database. If it is blank, or has another database displayed follow the below instructions
- Click the
database dropdown - Browse to the appropriate database
- Select it.
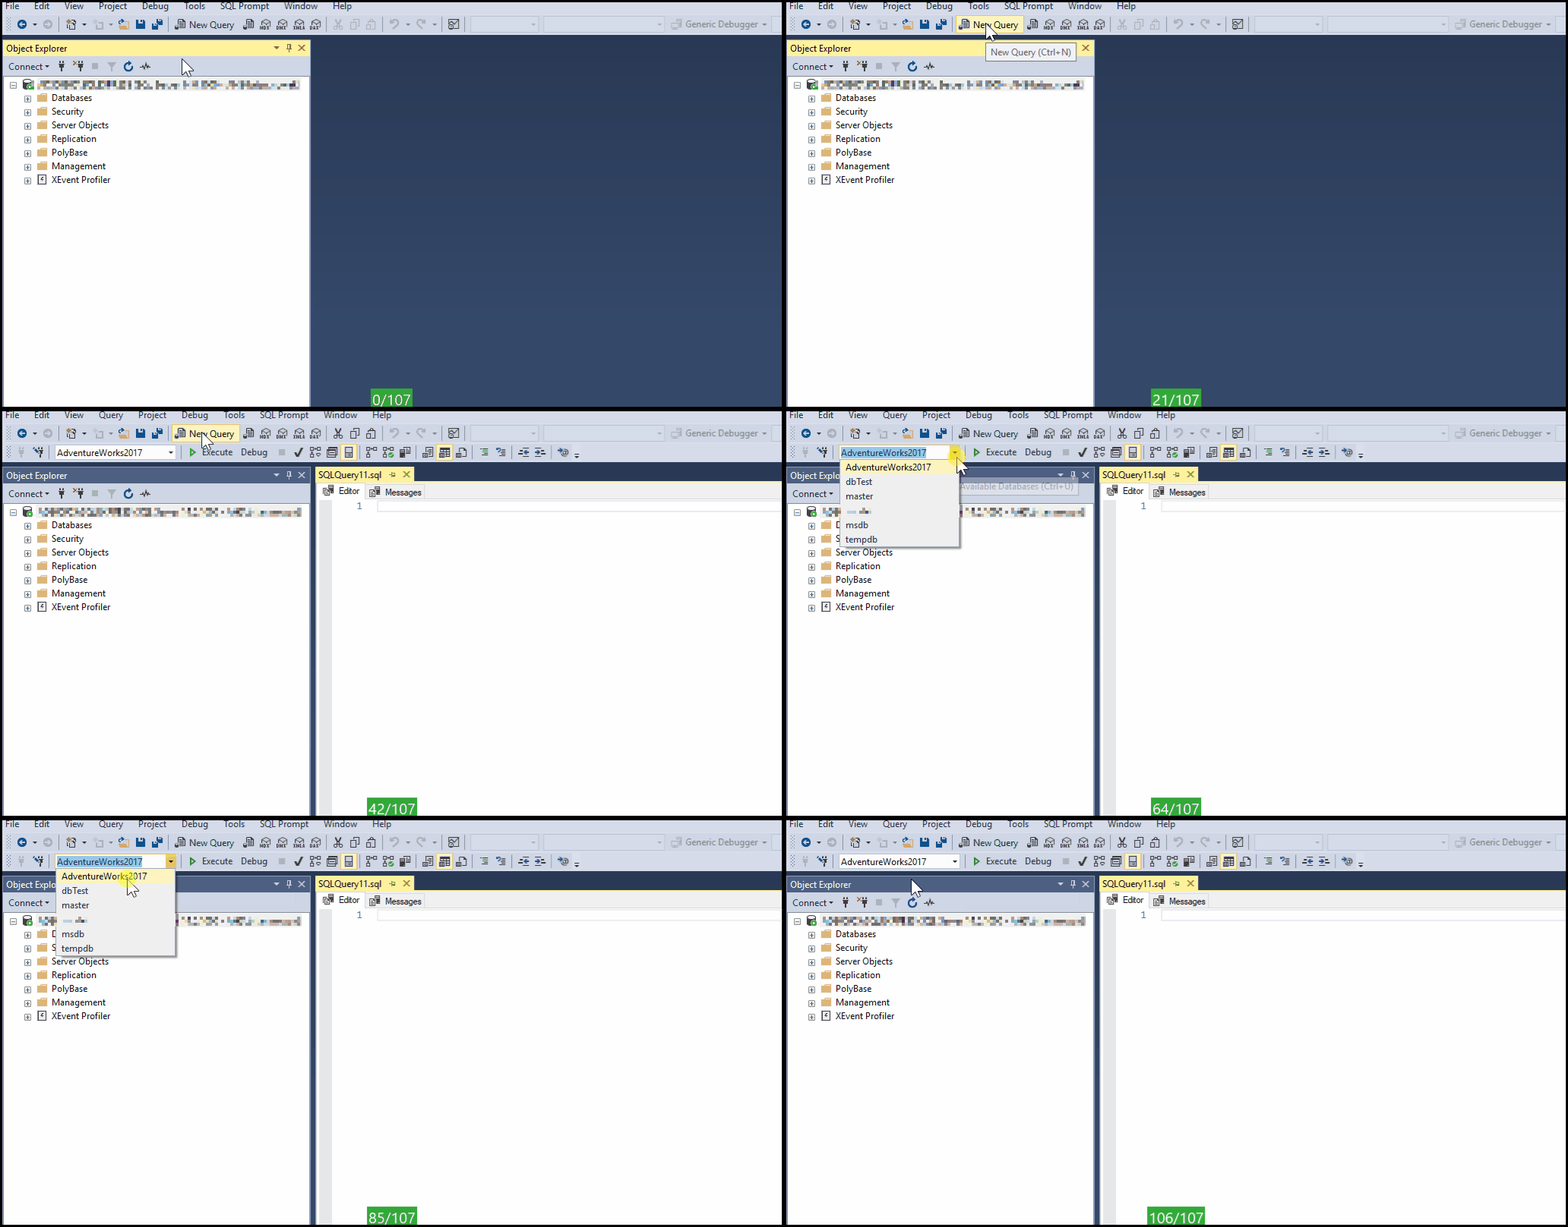
After you have a New Query window and have verified the database connection is correct, you can write a simple query against any of the views or tables.
SELECT * FROM <Schema Name>.<Name of the VIEW or TABLE>
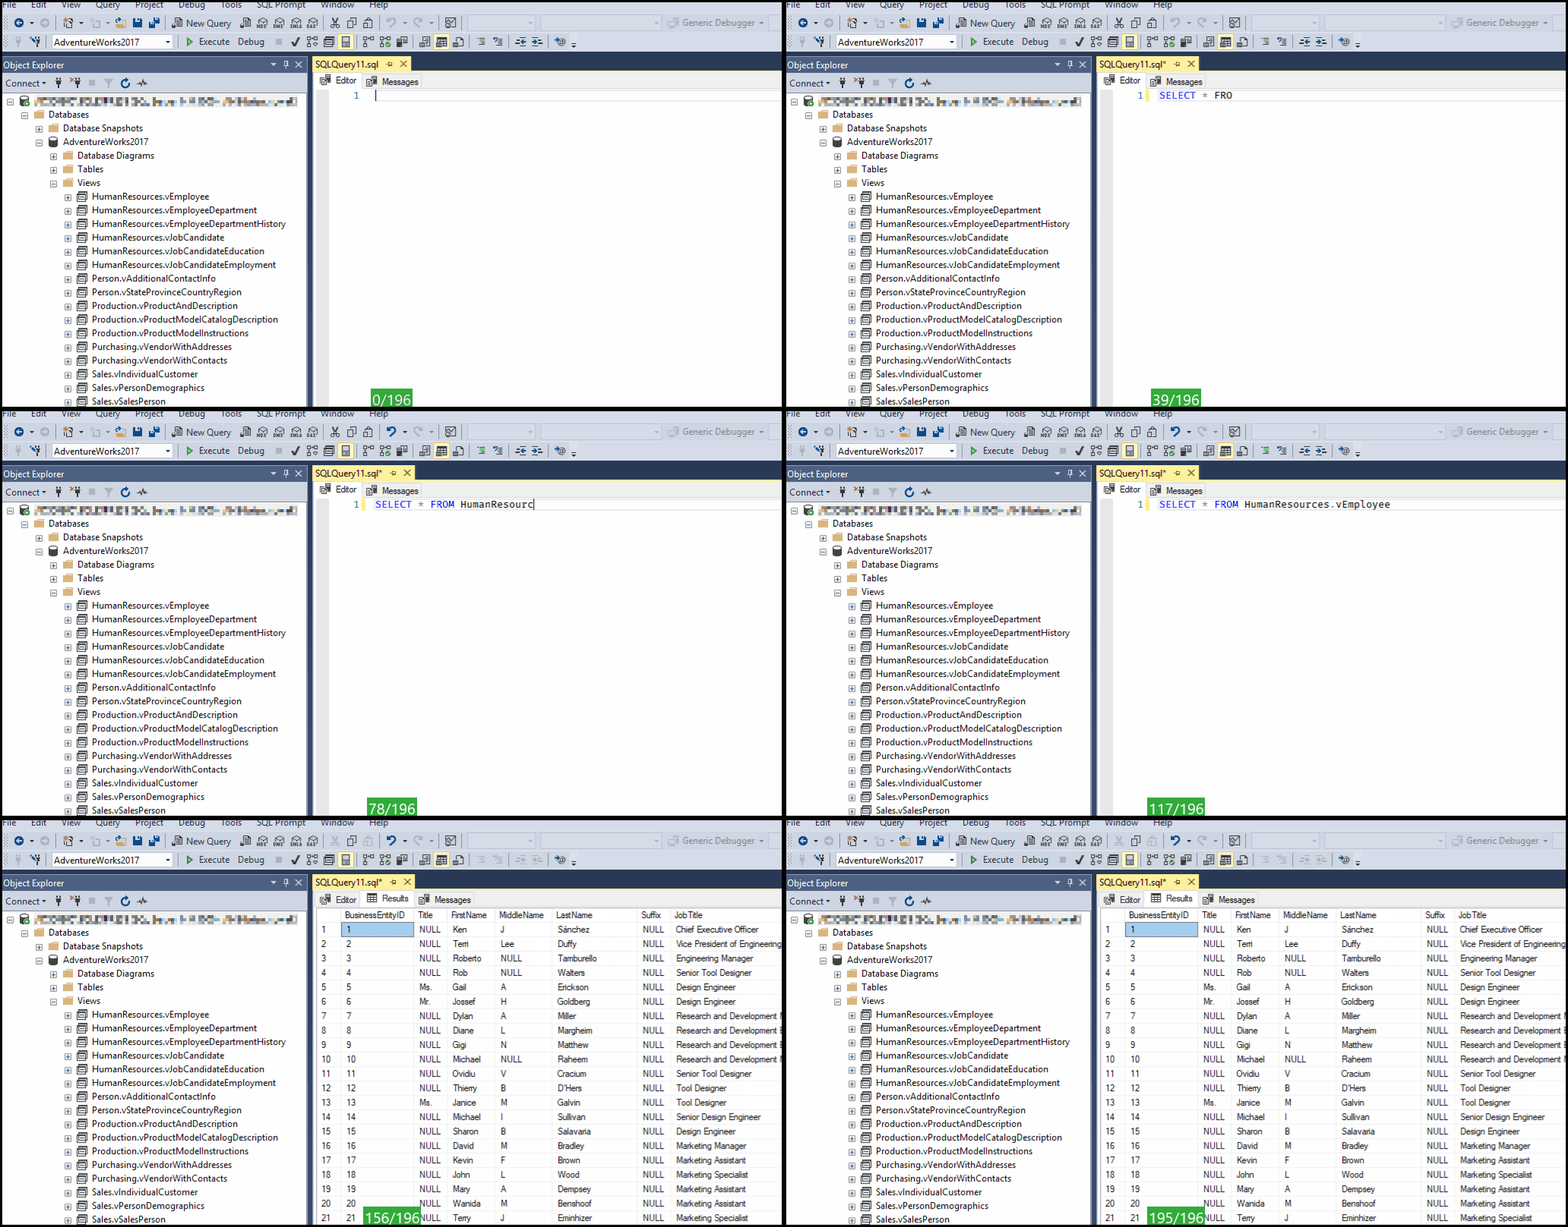
The * (Asterix) in a SQL SELECT means "All Columns". If we only wanted to return results for specific columns, we'd need to specify them.
<Schema Name> is displayed on all objects in the Object Explorer window. In the above GIF, the <Schema Name> for the View vEmployee is HumanResources. Schemas are a way to logically group related objects together.
If we only wanted to see the Title, FirstName, and LastName from the HumanResources.vEmployee table, we'd need to write a query like the following:
SELECT jobtitle, firstname, lastname FROM HumanResources.vEmployee
Advantages: Over time, it's more likely that you'll be reusing saved query files. Once opened, all you'll need to do is confirm the correct target database, making this the faster option.
Disadvantages: You can unintentionally connect to the wrong database when you create a new query or open an existing one when working with multiple systems.
Limiting Data #
Now that we can get data out of the system, we need to limit what is returned.
To do this, we'll need to add a WHERE clause to our SELECT statements by specifying that a given COLUMN from the VIEW we are querying is either within a range of values, or an exact value.
WHERE - Exact Match #
Let's say we are looking up all entries in vEmployee where the persons last name is "Smith"
SELECT *
FROM HumanResources.vEmployee
WHERE LastName = 'Smith';
Long as we have no typo's, we should get back any records that exist where the column 'LastName' has a value of "Smith".
WHERE - Wild Cards #
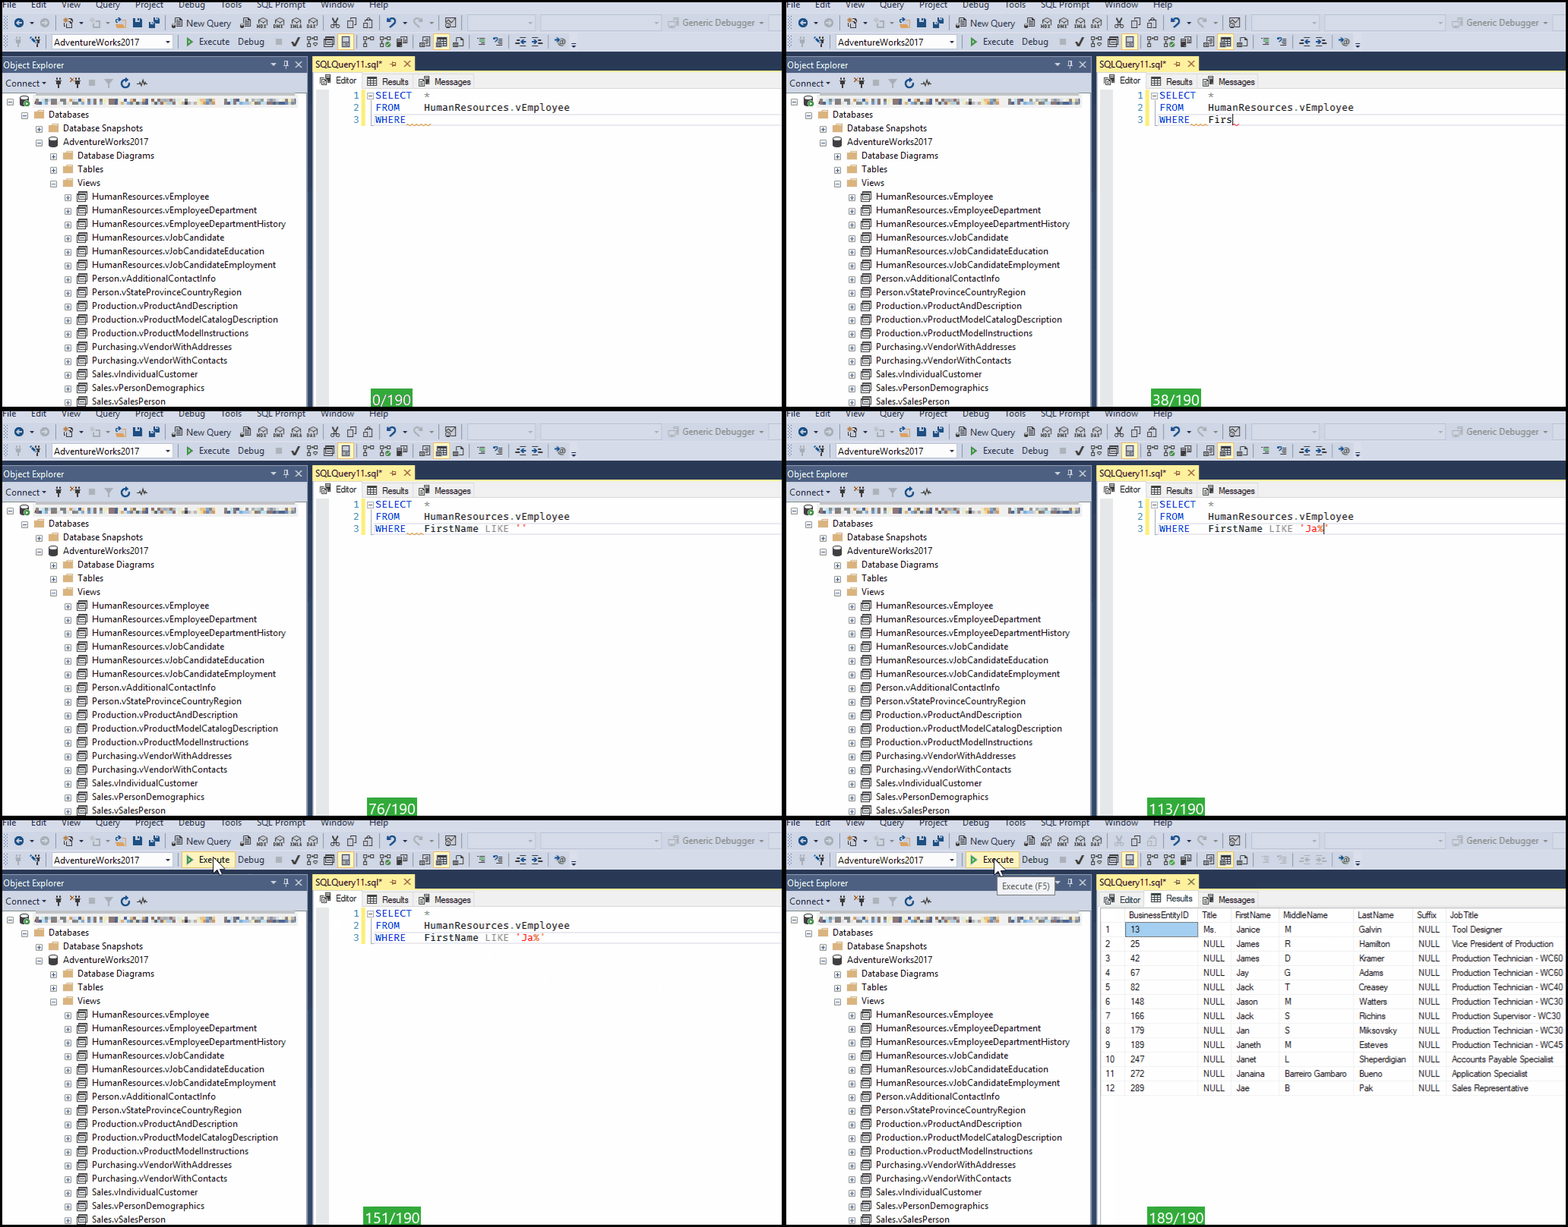
Let's say we are looking up entries for all entries where the FirstName starts with the characters "Ja". To do this, we need to use the % Wildcard Operator with the LIKE keyword.
SELECT *
FROM HumanResources.vEmployee
WHERE FirstName LIKE 'Ja%';
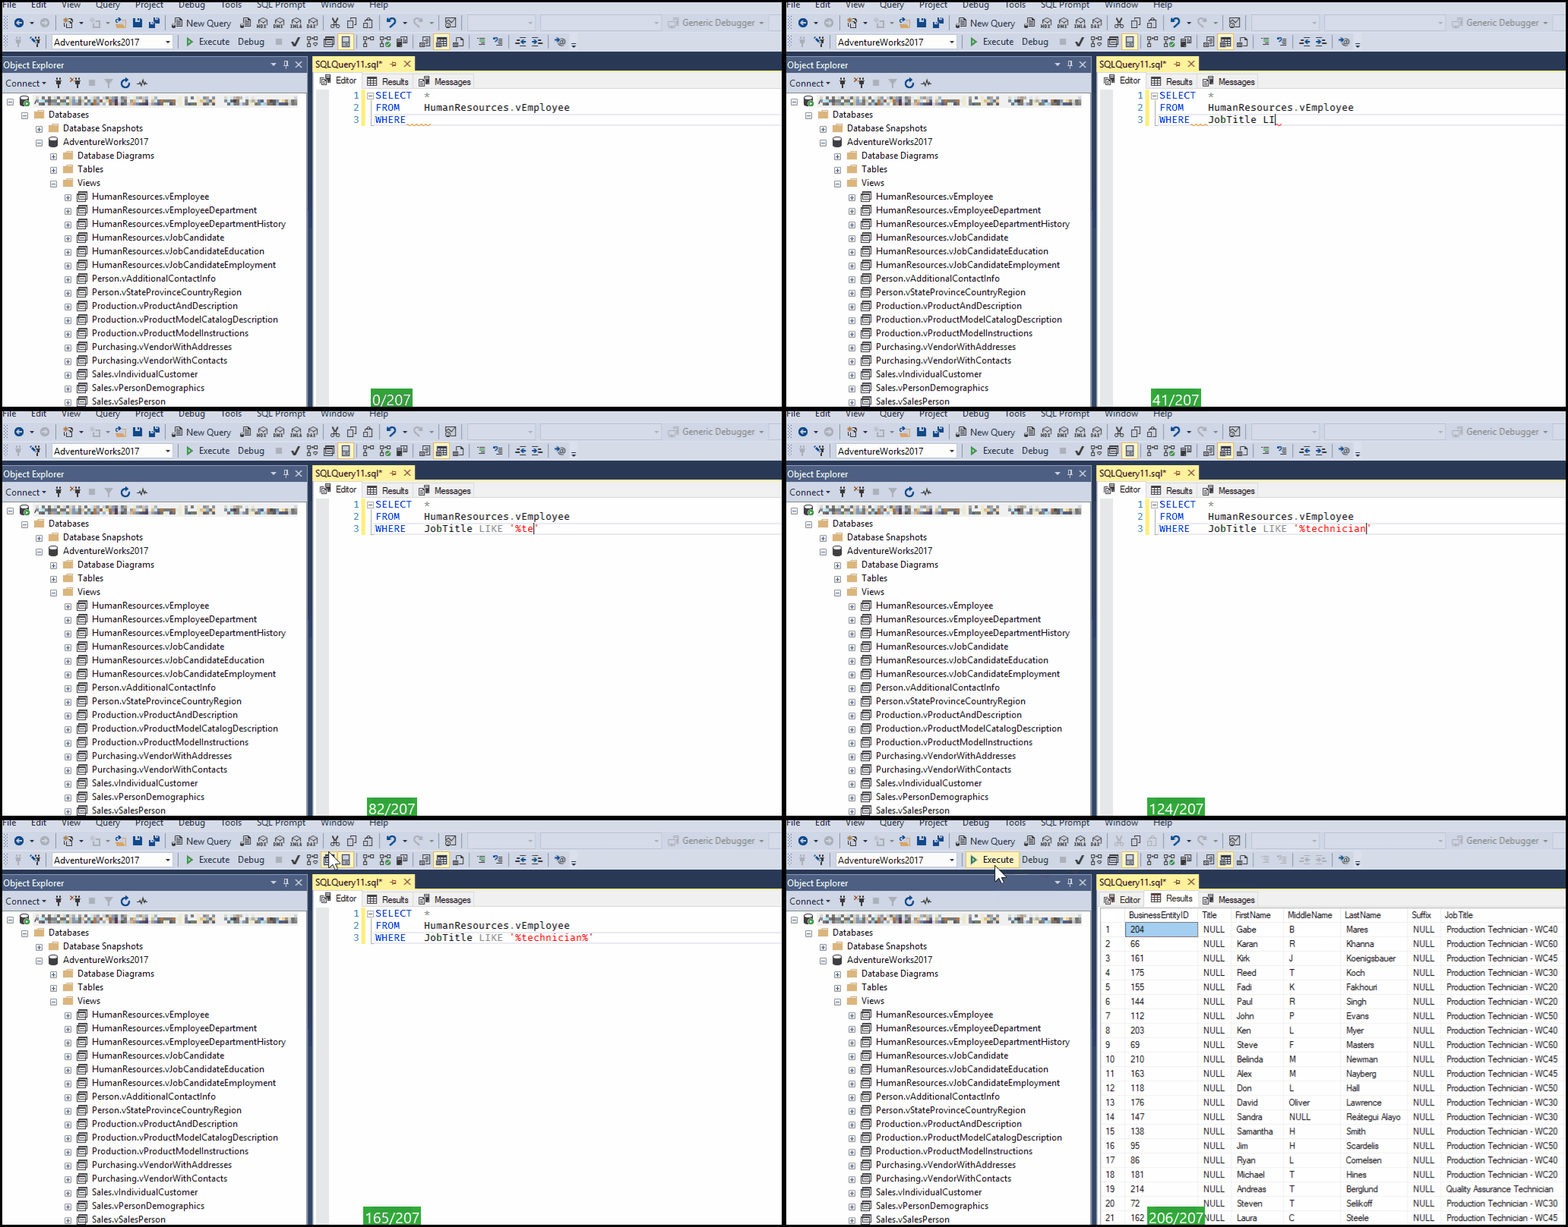
You may want to find all employees with the key word "Technician" in their title. To do this, place a % Wildcard Operator on either side of the string to be matched against.
SELECT *
FROM HumanResources.vEmployee
WHERE JobTitle LIKE '%technician%';
WHERE - Date Ranges #
There may be instances where you want to search for data that falls within a range of values, say two dates.
The following returns all employees with a HireDate between '01/01/2009' AND '01/01/2010'.
SELECT *
FROM [HumanResources].[Employee]
WHERE HireDate BETWEEN '01/01/2009' AND '01/01/2010'
WHERE - Multiple Criteria #
Often times we are limiting data by a number of factors. Say we want to know all employee's with a HireDate between '01/01/2009' AND '01/01/2010' who are Technicians?
We can use the AND key word to combine multiple Boolean Expressions.
SELECT *
FROM [HumanResources].[Employee]
WHERE HireDate BETWEEN '01/01/2009' AND '01/01/2010'
AND JobTitle LIKE '%technician%';
There is no limit to the number of these that we can add. For example, we can then check to see which employee's have 40 or more SickLeaveHours
SELECT *
FROM [HumanResources].[Employee]
WHERE HireDate BETWEEN '01/01/2009' AND '01/01/2010'
AND JobTitle LIKE '%technician%'
AND SickLeaveHours >= 40;
Exporting Data #
Exporting can be done in a few ways
- Copy and Paste results
- Exporting to...
- EXCEL
- CSV
- Tab Delimited File
Export - Copy and Paste #
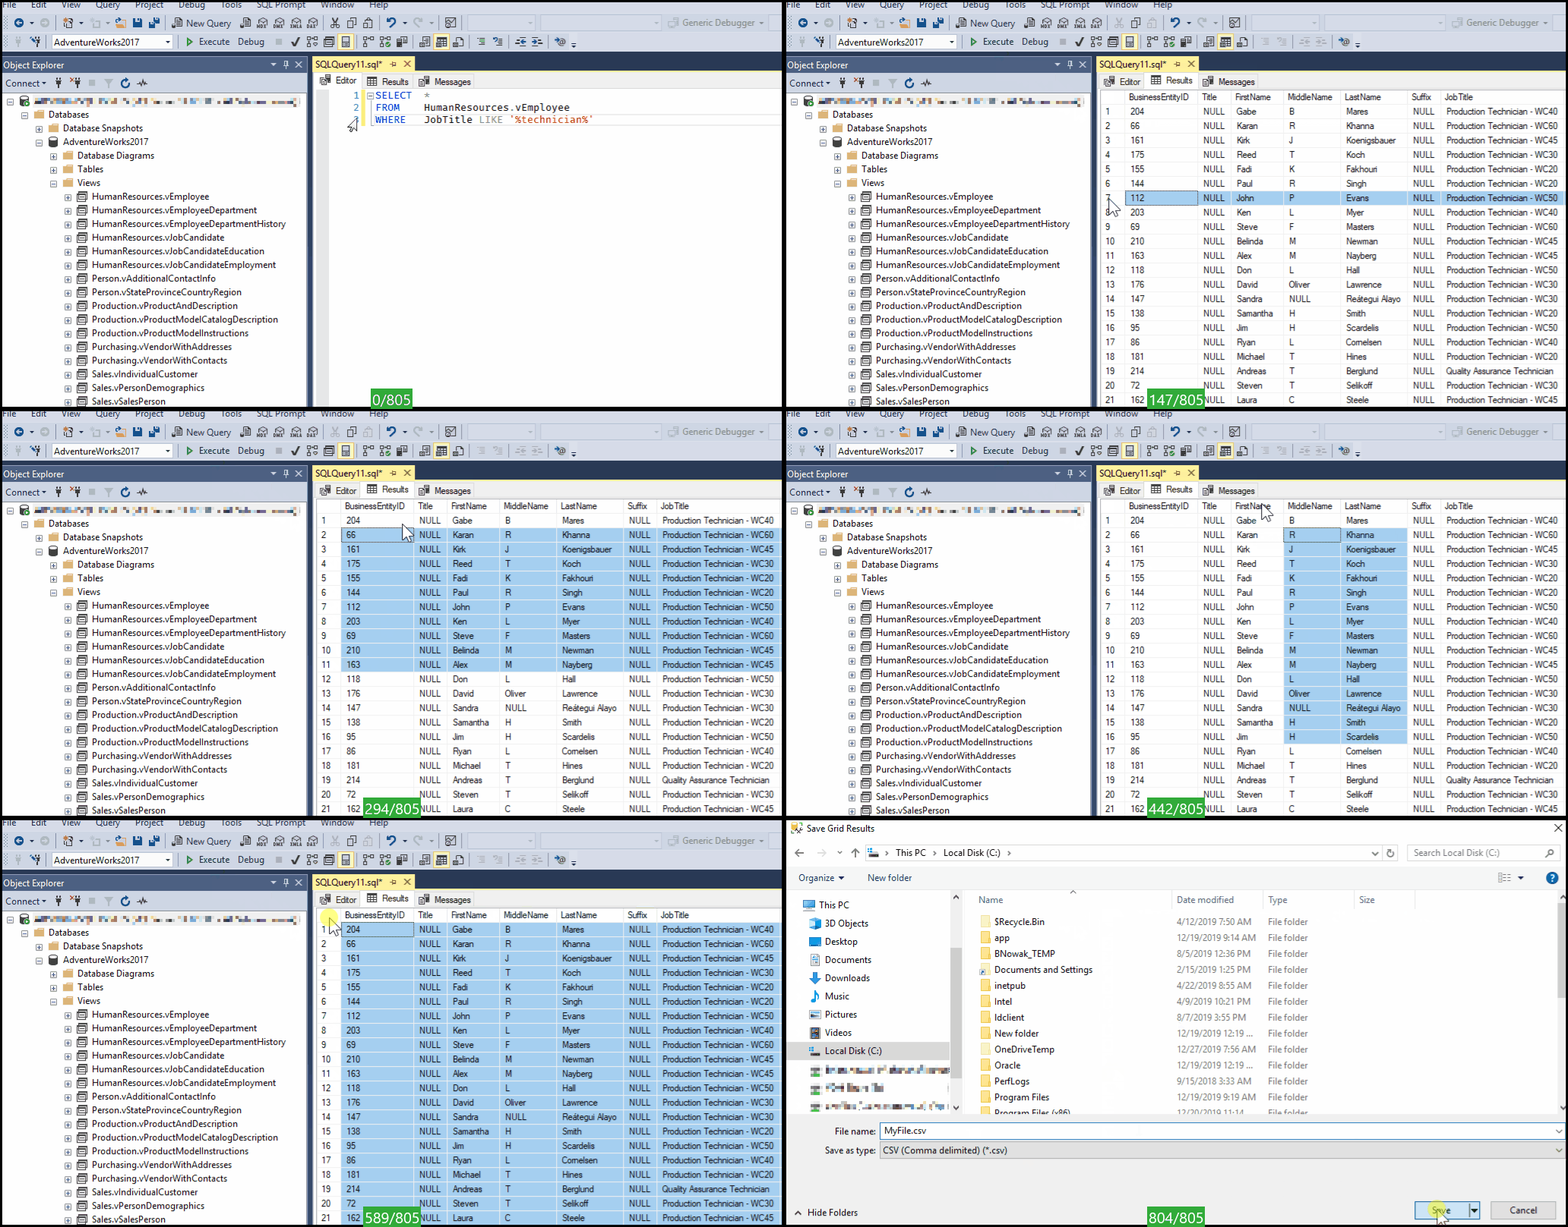
After you have run a query, you can select the data you want to copy in much the same way you would in programs like Microsoft Excel.
The below GIF demonstrates how to select ...
- A single Row
- A single Column
- Multiple Rows
- Multiple Columns
- A block of data
- All Results
At the point you have the data you want you can copy it in a number of ways
- Ctrl+C
- Right-Click -> Copy
- Right-Click -> Copy With Headers
- Will copy selected data and include Column Names as they appear in the header.
- Right-Click -> Open in Excel
- Open the selected results in Excel (Not shown in below GIF)
- Right-Click -> Save As
- Export to a
.CSVfile.
- Export to a
